Art of Re-entry: Practical Strategies for When Your Antegrade Wire Lands Subintimal
The moment your antegrade wire slips into the subintimal space is one of the most common and challenging junctions in chronic total occlusion work. This is where technique, planning, and calm decision making separate a controlled re-entry from a prolonged, futile battle. The goal is simple: get back into the true lumen safely, preserve side branches, and avoid making the distal vessel unrecoverable.
Why re-entry planning matters
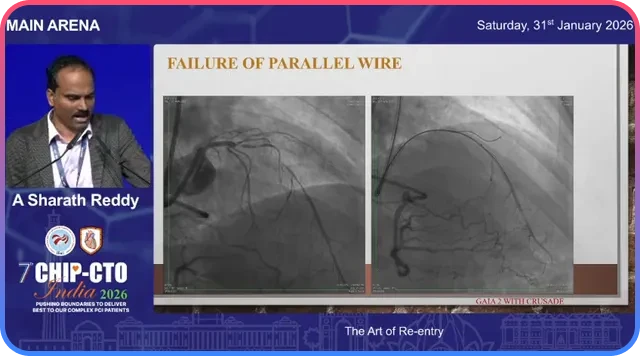
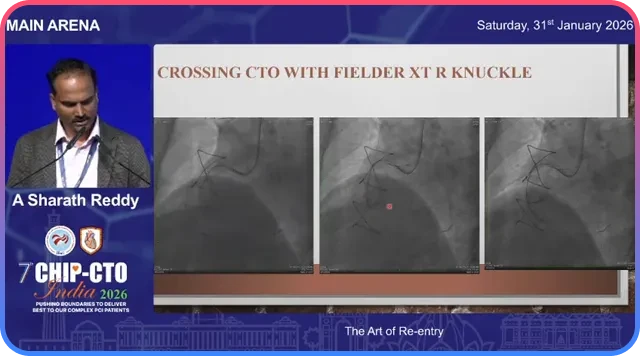
Re-entry is not an afterthought. It should be part of the plan before you even cross the proximal cap—especially when retrograde options are limited or absent. The moment the wire goes subintimal, several competing techniques become available: redirect the same wire, escalate the wire, use a parallel wire with a stiffer or escalated tip, employ a dedicated re-entry device such as Stingray, use intravascular ultrasound guided tip-detection re-entry, or convert to a retrograde approach. Each option has strengths and drawbacks.
Key concept: the first three strategies—redirection, wire escalation, and parallel wiring—can be mutually exclusive in practice. Spending a long time committed to one approach can make the others impossible because vessel clarity degrades and subintimal hematoma increases.
Use imaging to choose and protect the re-entry zone
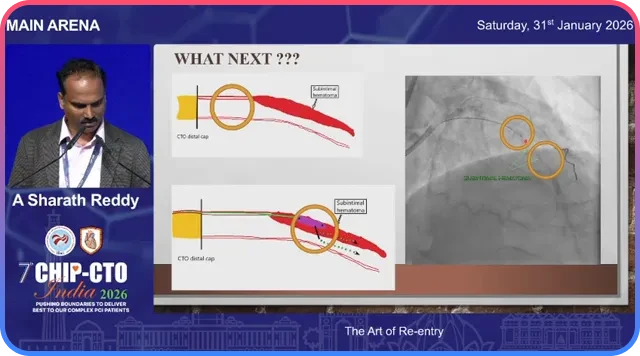
Computed tomography angiography and careful angiographic planning are invaluable. When facing a long, calcified CTO it is essential to identify a re-entry zone where the vessel is relatively free of calcium and visible on angiography. Pick that spot and protect it from repeated knuckle passes and aggressive subintimal maneuvers.
Ask the right questions before you commit:
- Where will I attempt re-entry?
- What support will I need?
- What is my planned dissection or crossing strategy?
- How will I protect my re-entry zone from intramural hematoma?
- What re-entry method will I use?
Initial maneuvers when you’re subintimal
Before deploying a re-entry tool, strengthen support and prepare the pathway.
Anchor and trap technique
Trap the microcatheter by inflating a balloon proximally to get additional support for device exchanges and advancement.
Create space for the re-entry device
A 1.0 mm balloon inflation can help dilate the subintimal plane. Alternatively advance a supportive microcatheter or Corsair-type catheter over an exchange wire to create a track for the re-entry catheter.
Use an exchange wire
Once the track is prepared, exchange to a stiffer support wire to deliver the Stingray or other re-entry platform.
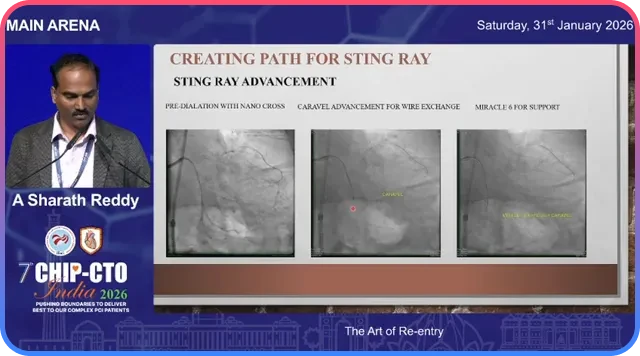
Stingray re-entry: step-by-step practical tips
The Stingray system is a powerful tool for controlled re-entry when a suitable angiographic re-entry zone exists. The technique has pitfalls; following a systematic approach increases the chance of success.
- Choose the re-entry zone: preferably where the vessel lumen is clearly seen and calcium burden is low on cross-section imaging.
- Enhance support: place an anchor wire into a side branch or distal vessel to enhance pushability for Stingray delivery.
- Create a track: dilate the subintimal space with a small balloon or advance a microcatheter and exchange for a stiff wire.
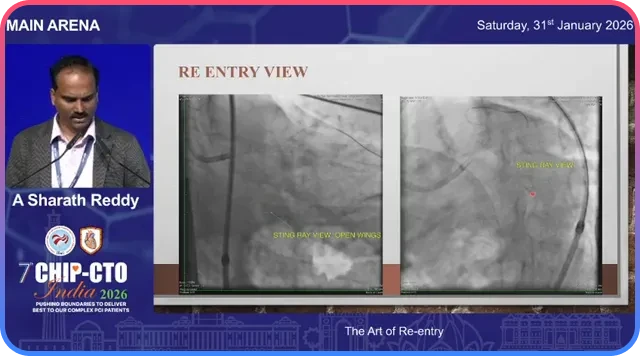
- Obtain the correct angiographic view: make sure you obtain the optimal face-on view so that the Stingray exits align toward the true lumen.
- Contrast injection: inject contrast with the Stingray in place to map where the true lumen lies relative to the Stingray exits.
- Trial and error with the Stingray wire: any of the Stingray exits can lead to the true lumen.
Practical note: There is no single “magic exit” on the Stingray that always points to the true lumen. Re-entry may require a few attempts at different exits until the wire enters the lumen.
When re-entry is difficult: read the anatomy and correct the physiology
As the procedure progresses the subintimal space can expand and subintimal hematoma (SIH) can push the true lumen away from your re-entry device. Increased SIH is the most common reason why a seemingly straightforward re-entry becomes impossible.
Options when re-entry becomes challenging
- Reduce the hematoma: decompression techniques can bring the true lumen closer to the re-entry device.
- Move the Stingray: sliding the Stingray to a nearby spot where the true lumen is closer can convert a failed attempt into a successful one.
- Enhanced support and parallel strategies: place a wire in a side branch to anchor and then re-attempt re-entry.
Facilitated ADR: protecting the true lumen during re-entry
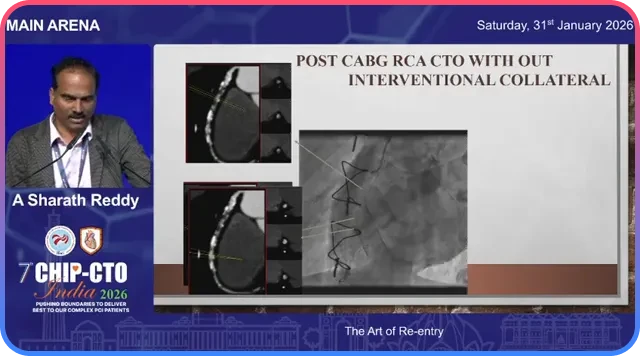
Facilitated antegrade dissection and re-entry is particularly useful in post-CABG patients or when the distal vessel is accessible via a retrograde channel.
The facilitated ADR sequence can look like this:
- Perform antegrade dissection intentionally and advance into the subintimal plane.
- Go retrograde with a wire into the distal true lumen or PDA via available collaterals or a graft channel.
- Pass a low-profile balloon retrograde and inflate it in the distal true lumen at the planned re-entry site.
- Use the inflated balloon as a protected target and direct the antegrade wire toward it.
Tip-detection re-entry with intravascular ultrasound (IVUS)
When conventional angiographic methods fail, intravascular ultrasound becomes a reliable option for tip-detection re-entry.
Use IVUS to:
- Identify the true lumen in real time.
- Guide precise orientation of the re-entry wire.
- Confirm wire position before committing to ballooning or stenting.
IVUS-guided tip detection reduces the guesswork. In large subintimal spaces it can be the difference between a lengthy failed attempt and a controlled, successful re-entry.

When to stop and switch strategy
Not every CTO is a candidate for aggressive re-entry. Diffuse distal disease, poor distal targets, and cases where repeated re-entry attempts enlarge the subintimal hematoma to the point of jeopardizing the distal vessel are indications to pause and reconsider.
- Investment strategy: perform limited ballooning to restore some flow and abort the intense re-entry attempt.
- Staging: come back later after the vessel has healed or after planning retrograde options.
- Change approach: consider retrograde crossing, surgical referral, or hybrid approaches.
Practical checklist for re-entry readiness
- Re-entry zone identified and free of heavy calcium.
- Support plan in place.
- Space creation method ready for Stingray delivery.
- Imaging tools available.
- Backup strategies prepared.
Common pitfalls and how to avoid them
- Over-commitment to one technique: avoid hanging on to a single method for too long.
- Ignoring imaging: CTA and IVUS reveal target zones and calcium burden that fluoroscopy alone cannot.
- Poor orientation of Stingray: ensure the correct angiographic projection.
- Failure to reduce subintimal hematoma: strategy should pivot to decompression techniques prior to re-attempt.
Summary
Re-entry is a skill and a decision-making process. When your antegrade wire lies in the subintimal plane, you have multiple tools and tactics: redirect the wire, escalate, use a parallel wire, deploy Stingray, use IVUS-guided tip detection, or go retrograde.
Remember that the first three options can negate each other if pursued too long. Be ready to change strategy, reduce subintimal hematoma promptly, and use facilitated ADR or IVUS if conventional attempts fail.
Frequently Asked Questions
The main options are redirect the same wire, escalate to a stiffer or different tip wire, use a parallel wire strategy, use a dedicated re-entry device such as Stingray, perform IVUS-guided tip-detection re-entry, or change to a retrograde approach.
Use CTA and angiography to identify a segment with minimal calcium and good visibility. Save that spot from repeated knuckle passes and heavy instrumentation.
Stingray is effective when you have an angiographically visible, non-calcified re-entry zone and can create a track for the device. IVUS is preferred when the anatomy is ambiguous or when subintimal hematoma has distorted the lumen.
A buckling or coiling wire on attempted re-entry, persistent failure across multiple exits, and progressive loss of angiographic lumen visibility are classic signs.
Facilitated ADR uses a retrograde balloon placed and inflated in the distal true lumen to mark and protect the re-entry site.
If repeated attempts create large subintimal spaces, distal target disease is diffuse, or no viable retrograde options exist, a controlled stop with balloon-only therapy preserves distal vessels and allows future staged strategies.